
Boot Action Reference
The boot action is used to cause the device to boot using the deployed
files. Depending on the parameters in the job definition, this could be by
executing a command on the dispatcher (for example
/usr/bin/qemu-system-x86_64) or by connecting to the device over serial or
ssh. Depending on the power state of the device and the device configuration,
the device may be powered up or reset to provoke the boot.
Every boot action must specify a method which is used to determine how
to boot the deployed files on the device. Depending on the method, other
parameters will be required.
Boot actions which result in a POSIX type login or shell must specify a list of expected prompts which will be matched against the output to determine the endpoint of the boot process. There are no default prompts, the test writer is responsible for providing a list of all possible prompts.
See also
Boot is a top level action that is part of the actions list. Here is an
example of full boot action from the test job definition:
- boot:
  namespace: target
  timeout:
    minutes: 15
  method: u-boot
  auto_login:
    login_prompt: 'am57xx-evm login:'
    username: root
    password_prompt: "Password:"
    password: "P@ssword-1"
    login_commands:
    - P@ssword-1
    - azertAZERT12345
    - azertAZERT12345
    - azertAZERT12345
  prompts:
  - 'Current password: '
  - 'New password: '
  - 'Retype new password: '
  - 'root@am57xx-evm:'
  transfer_overlay:
    download_command: unset http_proxy ; dhclient eth1 ; cd /tmp ; wget
    unpack_command: tar -C / -xzf
  commands:
  - setenv fdtfile am57xx-beagle-x15.dtb
  - setenv console ttyS2,115200n8
  - setenv mmcdev 1
  - setenv bootpart 1:9
  - run mmcboot
  ignore_kernel_messages: false
auto_login
Some systems require the test job to specify a username and optionally a
password to login. These values must be specified in the test job submission.
If the system boots directly to a prompt without needing a login, the
auto_login details can be omitted from the test job submission.
Note
The test job submission uses auto_login with underscore.
login_prompt
The prompt to match when the system requires a login. This prompt needs to be
unique across the entire boot sequence, so typically includes : and should
be quoted. If the hostname of the device is included in the prompt, this can be
included in the login_prompt:
- boot:
  auto_login:
    login_prompt: 'login:'
    username: root
Note
If login_prompt is not matched during boot LAVA will send control
characters to the shell “thinking” that the kernel alert happened
which may result in incorrect login but after it recognizes the
Login incorrect message it will automatically try to log in
using provided credentials.
username
Whenever a login_prompt is specified, a username will also be required.
The username should either be root or a user with sudo access without
needing a password.
password_prompt
If the login requires a password as well as a username, the password_prompt
must be specified:
- boot:
    auto_login:
      login_prompt: 'login:'
      username: root
      password_prompt: 'Password:'
      password: rootme
Note
If password_prompt is not matched during login or password is
required but not provided LAVA will recognize the Login timed out
message, stop the execution of the job and log the error.
password
Whenever a password_prompt is specified, a password will also be
required.
login_commands
A list of arbitrary login_commands can be run after the initial login and
before setting the shell prompt. This is typically used to make a regular user
become root with su. For example:
- boot:
    auto_login:
      login_prompt: 'login:'
      username: user
      password_prompt: 'Password:'
      password: pass
      login_commands:
      - sudo su
Note
No interactive input such as a password can be provided with the list
of login_commands.
prompts
After login (or directly from boot if no login is required), LAVA needs to match the first prompt offered by the booted system. The full list of possible prompts must be specified by the test writer in the test job submission.
Each prompt needs to be unique across the entire boot sequence, so typically
includes : and needs to be quoted. If the hostname of the device is
included in the prompt, this can be included in the prompt:
Caution
Take care with the specified prompts. Prompt strings which do not
include enough characters can match early, resulting in a failed login.
Prompt strings which include extraneous characters may fail to match for all
test jobs. Avoid prompt elements which are user-specific, e.g. $
indicates an unprivileged user in some shells and # indicates the
superuser. ~ indicates the home directory in some shells. In general,
the prompt string should include and usually end with a colon : or a
colon and space.
- boot:
    prompts:
    - 'root@debian:'
When using the LXC protocol, the hostname element of the prompt will vary:
- boot:
    prompts:
    - 'root@(.*):'
When using a ramdisk, the prompt is likely to need to contain brackets which will need to be escaped:
- boot:
    prompts:
    # escape the brackets to ensure that the prompt does not match
    # kernel debug lines which may mention initramfs
    - '\(initramfs\)'
connection
connection-namespace
When using namespaces in job definition, you can reuse the
existing serial connection from another namespace via connection-namespace
parameter. This applies only to boot action Example:
actions:
- deploy:
    namespace: boot1
# ...
- boot:
    namespace: boot1
# ...
- test:
    namespace: boot1
# ...
- boot:
    namespace: boot2
    connection-namespace: boot1
# ...
- test:
    namespace: boot2
# ...
commands
One of the key definitions in the device type template for
each device is the list(s) of boot commands that the device
needs. These are sets of specific commands that will be run to boot
the device to start a test. The definitions will typically include
placeholders which LAVA will substitute with dynamic data as
necessary. For example, the full path to a tftp kernel image will be
expanded to include a job-specific temporary directory when a job is
started.
As a simple example from a U-Boot template:
- boot
    commands:
    - setenv autoload no
    - setenv initrd_high '0xffffffff'
    - setenv fdt_high '0xffffffff'
    - setenv loadkernel 'tftp {KERNEL_ADDR} {KERNEL}'
    - setenv loadinitrd 'tftp {RAMDISK_ADDR} {RAMDISK}; setenv initrd_size ${filesize}'
    - setenv loadfdt 'tftp {DTB_ADDR} {DTB}'
    - setenv bootcmd 'run loadkernel; run loadinitrd; run loadfdt; {BOOTX}'
    - boot
Note
In some cases, the boot commands list in the template may
not provide all of the commands used; lines will also be
generated from other data in the template. For example: the command
setenv kernel_addr_r '0x82000000' might be generated from the
load addresses which match the type of kernel being deployed.
When a test is started, the appropriate list of commands will be selected. LAVA then substitutes the placeholders in the list to generate a complete command list. The final parsed and expanded boot commands used for a test are reported in the logs for that test job, e.g.:
Parsed boot commands: setenv autoload no; setenv initrd_high '0xffffffff';
setenv fdt_high '0xffffffff'; setenv kernel_addr_r '0x82000000'; setenv
initrd_addr_r '0x83000000'; setenv fdt_addr_r '0x88000000'; setenv loadkernel
'tftp ${kernel_addr_r} 158349/tftp-deploy-Fo78o6/vmlinuz'; setenv loadinitrd
'tftp ${initrd_addr_r} 158349/tftp-deploy-Fo78o6/ramdisk.cpio.gz.uboot; setenv
initrd_size ${filesize}'; setenv loadfdt 'tftp ${fdt_addr_r}
158349/tftp-deploy-Fo78o6/am335x-boneblack.dtb'; setenv bootargs
'console=ttyO0,115200n8 root=/dev/ram0  ip=dhcp'; setenv bootcmd 'dhcp; setenv
serverip 10.3.1.1; run loadkernel; run loadinitrd; run loadfdt; bootz
0x82000000 0x83000000 0x88000000'; boot
Specifying commands in full
During testing and development, it can sometimes be useful to use a different set of boot commands instead of what is listed in the jinja2 template for the device-type. This allows test writers to change boot commands beyond the scope of existing overrides. To work sensibly in the LAVA environment, these commands will still need to include the placeholders such that temporary paths etc. can be substituted in when the test job is started.
In this example (for an x86 test machine using iPXE), the commands
change the root argument to the kernel to boot from a SATA drive
which has been configured separately. (For example, by the admins or
by test writers from a hacking session.)
- boot:
    timeout:
      minutes: 8
    method: ipxe
    commands:
      - dhcp net0
      - set console console=ttyS0,115200n8 lava_mac={LAVA_MAC}
      - set extraargs ip=dhcp root=/dev/sda1 rw
      - kernel tftp://{SERVER_IP}/{KERNEL} ${extraargs} ${console}
      - initrd tftp://{SERVER_IP}/{RAMDISK}
Caution
This support is recommended for use for corner cases that can’t be fixed on the level of device type. Accordingly, LAVA will raise a warning each time this support is used. Abuse of this support can potentially stop devices from working in subsequent tests, or maybe even damage them permanently - be careful!
If the commands are to be used regularly, ask on the lava-users mailing list requesting that a label is created in the templates for this set of commands. Alternatively, you can request a new override to make the existing labels more flexible. You can also propose a patch yourself.
Appending to the kernel command line
A test job may require extra kernel command line options to enable or disable particular functionality. The job context can be used to append strings to the kernel command line:
context:
  extra_kernel_args: vsyscall=native
job context is a top level element of LAVA job definition. It is not a part of boot section.
Values need to be separated by whitespace and will be added to the command line with a prefix of a single space and a suffix of a single space.
The possible values which can be used are determined solely by the support available within the kernel provided to the DUT.
Depending on the boot method, it may also be possible to add specific options,
for example to append values to the NFS options using extra_nfsroot_args:
context:
  extra_nfsroot_args: ,rsize=4096 nfsrootdebug
Note
extra_nfsroot_args are appended directly to the existing NFS
flags nfsroot={NFS_SERVER_IP}:{NFSROOTFS},tcp,hard,intr so if the
appended string contains an extra flag, this must be put first and the
string must start with a comma. Other options can then be separated by a
space or can use extra_kernel_args. The example above would result in
the string nfsroot={NFS_SERVER_IP}:{NFSROOTFS},tcp,hard,intr,rsize=4096
nfsrootdebug.
failure_message
Some devices deploy the boot commands inside the boot image which is
then deployed using fastboot. To boot the device after deployment,
LAVA does not interrupt the bootloader (e.g. U-Boot or Grub) and lets
the configured boot arguments control the boot.
In some situations, a test kernel can fail and cause the device to
reset to the bootloader. The presence of configured boot commands leads
to the device booting into an environment which is not necessarily the
one required by the test writer and the failure of the test kernel can
then be hidden. To handle this issue, a failure_message can be
specified to match a string output by the bootloader after the device
has reset. The test job will then fail after the reset and tracking the
kernel errors.
See also
ignore_kernel_messages
Some test scenarios assume deliberately forcing kernel panic. This might
interfere with LAVA failure detection. To prevent LAVA from stopping the
job in such circumstance ignore_kernel_messages should be set to true.
LAVA won’t be able to detect any other “legitimate” kernel crashes in such
situation. Default value is false.
Pattern U-Boot SPL 20[0-9][0-9] is used to detect board reset. LAVA job
will terminate on unexpected reset. Users can disable the detection using the
same option. This can be useful in scenarios where a board reset is expected.
method
The boot method determines how the device is booted and which commands and
prompts are used to determine a successful boot.
avh
The avh boot method allows you to create and boot Arm Virtual Hardware
models. Example definition:
- boot:
    method: avh
    bootargs:
      normal: earlycon=uart8250,mmio32,0xfe215040 console=ttyS0,115200n8 rw rootwait root=/dev/mmcblk0p2 coherent_pool=1M 8250.nr_uarts=1 cma=64M
      restore: earlycon=uart8250,mmio32,0xfe215040 console=ttyS0,115200n8 console=tty0 rw rootwait root=/dev/mmcblk0p2 coherent_pool=1M 8250.nr_uarts=1 cma=64M init=/usr/lib/raspi-config/init_resize.sh
    timeout:
      minutes: 20
    docker:
      image: ghcr.io/vi/websocat:v1.14.1
      local: true
    prompts:
    - "pi@raspberrypi:"
    - "root@raspberrypi:"
    auto_login:
      login_prompt: "login:"
      username: pi
      password_prompt: 'Password:'
      password: raspberry
      login_commands:
      - sudo su
bootargs
The bootargs dictionary allows you to override the default Kernel bootargs
provided by the AVH model. The normal key is used for every regular boot.
The restore key, if present, is used for a first boot prior to the device
being declared ready. It is expected that the device will reboot itself to
indicate that this phase is complete. It is used, for example, on the Raspberry
Pi 4 to expand the root FS.
docker
avh boot method uses websocat for
connecting to AVH device serial console. ghcr.io/vi/websocat:v1.14.1
docker image is used by default. A docker image specified here overrides the
default image.
Note
Running an avh deploy before running an avh boot is required.
The boot method depends on the image path provided by the deploy method to
upload the image that needed by AVH instance creating.
bootloader
The bootloader method is used to power-on the DUT, interrupt the
bootloader, and wait for the bootloader prompt.
In order to interrupt the bootloader, the bootloader type should be specified
in the bootloader parameter:
- boot
    method: bootloader
    bootloader: u-boot
    commands: []
    prompts: ['=>']
Note
the bootloader method type should match a boot method supported by
the give device-type.
For example fastboot, minimal, pyocd, u-boot, …
The commands parameter is required but can be kept empty.
If some commands should be sent to the bootloader before the end of the action,
give the list in the commands parameter.
By default LAVA will reset the previous connection and the board power when executing
this action. Users can skip this step by adding reset_connection: false and
reset_device: false respectively.
cmsis-dap
The cmsis-dap boot method takes no arguments or parameters.
- boot
    method: cmsis-dap
    timeout:
      minutes: 10
depthcharge
The depthcharge boot method takes no arguments or parameters. It is used
to boot the downloaded kernel image, and optionally a device tree and a
ramdisk. The files are converted into an FIT (U-Boot Flattened Image Tree
format) image suitable to be booted by Coreboot using the Depthcharge payload,
typically used by Chrome OS devices. It also creates a separate text file with
the kernel command line which is made available to the DUT over TFTP
alongside the FIT image.
- boot:
    method: depthcharge
    commands: nfs
Note
Unlike some other boot methods such as u-boot, the
depthcharge boot method always expects the kernel image to be in
the same standard format (zImage for arm, Image for arm64…). So
there should not be any type attribute for the kernel image in
the deploy section as shown in the example below:
- deploy:
    kernel:
      url: http://storage.kernelci.org/mainline/master/v4.18-1283-g10f3e23f07cb/arm/multi_v7_defconfig/zImage
    ramdisk:
      url: http://storage.kernelci.org/images/rootfs/debian/stretchtests/20180627.0/armhf/rootfs.cpio.gz
      compression: gz
docker
Boot a docker image already deployed by a deploy to docker action.
- boot:
   method: docker
   command: bash
   prompts:
   - 'root@lava:'
   timeout:
     minutes: 2
command
The command to run when starting the docker container.
fastboot
The fastboot boot method takes no arguments or parameters.
- boot:
    method: fastboot
    namespace: droid
    prompts:
      - 'root@(.*):/#'
      - 'hikey:/'
    timeout:
      minutes: 15
Note
Since all fastboot DUT depend on LXC to run jobs, it is mandatory to have the namespace specified.
fastboot boot commands
Some test jobs may need to add a fastboot command prior to boot, for
example to specify whether the _a or _b partitions are to be
active.
If the test job specifies the images labels as boot_a instead
of boot, then a fastboot boot command will be required to make sure
that the device boots from boot_a instead of boot_b (which may
contain an old deployment from a previous test job or may contain nothing
at all).
- boot:
    method: fastboot
    commands:
    - --set-active=a
fastboot-nfs
The fastboot-nfs boot is a method that allow you specify a nfs rootfs in
a Android boot image via LXC image build and boot using fastboot boot method.
The job needs a require set of 3 primary actions:
Deploy rootfs over NFS
Download Kernel and DTB to LXC
Create Android boot image with NFS details provided by NFS_{ROOTFS,SERVER_IP} environment variables
device_type: dragonboard-410c

job_name: lxc-fastboot-nfs
timeouts:
  job:
    hours: 1
  action:
    minutes: 30
priority: medium
visibility: public

metadata:
  docs-source: actions-boot-qemu-nfs
  docs-filename: doc/v2/examples/test-jobs/fastboot-nfs.yaml

protocols:
  lava-lxc:
    name: lxc-fastboot-nfs-test
    template: debian
    distribution: debian
    release: buster
    arch: amd64
    mirror: http://mirror.bytemark.co.uk/debian
    verbose: true

actions:
- deploy:
    namespace: tlxc
    timeout:
      minutes: 10
    to: lxc
    packages:
     - mkbootimg
     - fastboot
    os: debian

- deploy:
    namespace: target
    timeout:
      minutes: 5
    to: nfs
    nfsrootfs:
      url: http://releases.linaro.org/96boards/dragonboard410c/linaro/openembedded/19.01/rpb/rpb-console-image-dragonboard-410c-20190130223248-110.rootfs.tar.xz
      compression: xz
    modules:
      url: http://releases.linaro.org/96boards/dragonboard410c/linaro/openembedded/19.01/rpb/modules--4.14-r0-dragonboard-410c-20190130223248-110.tgz
      compression: gz

- boot:
    namespace: tlxc
    prompts:
    - 'root@(.*):/#'
    timeout:
      minutes: 5
    method: lxc

- deploy:
    timeout:
      minutes: 40
    to: download
    namespace: target
    images:
      kernel:
        url: http://releases.linaro.org/96boards/dragonboard410c/linaro/openembedded/19.01/rpb/Image.gz--4.14-r0-dragonboard-410c-20190130223248-110.bin
        compression:
      dtb:
        url: http://releases.linaro.org/96boards/dragonboard410c/linaro/openembedded/19.01/rpb/Image.gz--4.14-r0-apq8016-sbc-20190130223248-110.dtb
        compression:

- test:
    namespace: tlxc
    timeout:
      minutes: 10
    definitions:
    - from: inline
      name: test-testdef
      path: inline/test-testdef
      repository:
        metadata:
          description: test definition env
          format: Lava-Test Test Definition 1.0
          name: test-testdef
        run:
          steps:
          - env
          - echo "$NFS_ROOTFS"
          - echo "$NFS_SERVER_IP"
          - cd /lava-lxc/
          - cp Image.gz--4.14-r0-dragonboard-410c-20190130223248-110.bin Image.gz+dtb # OE image already has dtb appended
          - mkbootimg --kernel Image.gz+dtb --cmdline "root=/dev/nfs rw nfsroot=$NFS_SERVER_IP:$NFS_ROOTFS ip=dhcp console=tty0 console=ttyMSM0,115200n8" -o boot.img
          - ls /lava-lxc/

- deploy:
    timeout:
      minutes: 40
    to: fastboot
    namespace: target
    images:
      boot:
        url: lxc:///boot.img
    protocols:
        lava-lxc:
        - action: fastboot-deploy
          request: pre-power-command
          timeout:
              minutes: 2

- boot:
    namespace: target
    prompts:
    - 'root@(.*):[/~]#'
    timeout:
      minutes: 15
    method: fastboot
    protocols:
      lava-lxc:
      - action: auto-login-action
        request: pre-os-command
        timeout:
          minutes: 2
See also
fvp
The fvp boot method allows you to run Fixed Virtual Platforms.
- boot:
    method: fvp
    prompts:
      - 'root@(.*):/#'
    image: /path/to/FVP_Binary
    licence_variable: ARMLMD_LICENSE_FILE=foo
    arguments:
      - "-C board.virtioblockdevice.image_path={DISK}"
      ...
    docker:
      name: "fvp_foundation:11.8"
      local: true
    timeout:
      minutes: 5
This boot method will launch the image file
(already present in the docker image provided)
with the arguments as parameters,
and the licence_variable set as an environment variable.
You can use {IMAGE_NAME} which will be replaced with the path to the
image with the same key under images in the previous fvp deploy stage.
{ARTIFACT_DIR} can also be used for the directory where all images are deployed.
You can provide erpc_app: image_key field to run a eRPC app. Both the
server and test apps must be deployed in advance. The image_key should be
the name of the test app. eRPC-related parameters for communication between the
apps should be configured at build time. Using a separate UART device is
recommended to avoid collision with other data being sent on UART. A
monitors test action can be defined right after the boot action to enable
log parsing and wait for run completion.
Note
Previous to running an fvp boot, you should run an fvp deploy.
Note
The docker image must have the fastmodel in it and must have the required tools, such as telnet.
grub
The grub boot method takes no arguments or parameters.
- boot:
    method: grub
    commands: ramdisk
grub-efi
The grub-efi boot method takes no arguments or parameters. However, in
most cases, starting Grub from UEFI requires using the
uefi-menu as well.
- boot:
    timeout:
      minutes: 4
    prompts:
      - 'root@stretch:'
    method: grub-efi
    commands: nfs
    auto_login:
      login_prompt: "login:"
      username: root
Download or view the complete example: examples/test-jobs/mustang-grub-efi.yaml
Note
Admins can refer to the mustang-grub-efi.jinja2 template for an
example of how to make selections from a UEFI menu to load Grub. See
Device type templates.
ipxe
The ipxe boot method takes no arguments or parameters.
- boot:
    method: ipxe
    commands: ramdisk
    prompts:
    - 'root@debian:~#'
    - '/ #'
lxc
See also
- boot:
    method: lxc
    prompts:
    - 'root@(.*):/#'
    timeout:
      minutes: 5
openocd
The openocd boot method takes no arguments or parameters.
The method works by passing through the command line options for the
openocd command. It downloads and runs the executable specified by binary
in the job definition. It also allows an openocd script file to be downloaded
from the location specified by openocd_script in the job definition, if
a custom script file should be used instead of the one specified by the
device type.
board_selection_cmd can be used in the device-type to specify a command to
pass the board id/serial number to OpenOCD. See OpenOCD documentation for
details on the command to set the serial number for the interface your
device type is using.
- boot:
    method: openocd
    timeout:
      minutes: 3
minimal
The minimal method is used to power-on the DUT and to let the
DUT boot without any interaction.
- boot
    method: minimal
    prompts:
    - 'root@debian:~#'
    - '/ #'
Note
auto-login and transfer_overlay are both supported for this method.
By default LAVA will reset the board power when executing this action. Users
can skip this step by adding reset: false. This can be useful when testing
bootloader in interactive tests and then booting to the OS.
- boot
    method: minimal
    reset: false
Pre power/os command defined in device dictionary can be executed by adding
pre_power_command: true or pre_os_command: true. These commands can be
useful to activate or deactivate external hardware before applying power.
- boot
    method: minimal
    pre_power_command: true
musca
The musca method is used to boot musca devices. Currently supported are the musca a,
musca b,
and musca s1.
Unlike the minimal boot, the board has to be powered on before the serial will be available
as the board is powered by the USB that provides the serial connection also.
Therefore, the board is powered on then connection to the serial is made.
Optionally, prompts can be used to check for serial output before continuing.
- boot:
    method: musca
Note
No shell is expected and no boot string is checked. All checking should be done with test monitors.
Note
Some initial setup steps are required to ensure that the Musca device boots when it is powered on.
Check here for details
on how to setup the board to auto-boot when it is programmed or turned on.
Ensure DETAILS.TXT on the MSD shows “Auto Reset” and “Auto Power” are activated.
pyocd
The pyocd boot method takes no arguments or parameters.
- boot:
    method: pyocd
    timeout:
      minutes: 10
The pyocd boot method requires configuration on the device type level.
Following configuration options are supported:
command- executable command to invokeoptions- list of options to pass to the executableconnect_before_flash- iftrue, connect to device before running pyocd flash command, otherwise after the command (default isfalse)
jlink
Installation
To install jlink, first download the “JLink Software and Documentation Pack” from the SEGGER website: https://www.segger.com/downloads/jlink/
Device type configuration
Example Configuration:
{% extends 'base-nxp-mcu.jinja2' %}
{% set usb_vendor_id = '1366' %}
{% set usb_product_id = '1024' %}
{% set processor = 'MIMXRT1189XXX8' %}
{% set supported_core_types = ['M33', 'M7'] %}
{% set erase_command = ['erase', 'r', 'connect'] %}
{% set reset_command = ['r'] %}
{% set device_info = device_info|default([{'board_id': board_id, 'usb_vendor_id': usb_vendor_id, 'usb_product_id': usb_product_id}]) %}
{% block jlink_options %}
- '-if {{target_interface|default("SWD")}}'
- '-speed {{ speed_ti|default(4000)}}'
{% endblock jlink_options %}
It is important to fill in all the parameters present in jlink_options block.
Note
You can configure the erase_command (default: [“erase”]) and reset_command (default: [“r”]) parameters for each device type.
These parameters are mandatory for the jlink boot action, refer to the base-nxp-mcu.jinja2 template for reference.
The supported_core_types parameter in the device type definition is optional (default = None).
It is used by JLink to connect to the board in cases where the board has multiple cores, such as with the M33 and M7 cores.
By default, the connection is made using the first core in the list, which in this case is the M33.
To connect to the second core (e.g., M7), you need to use the coretype parameter(optional) in the JLink boot method.
- boot:
    method: jlink
    prompts : ['SHELL>>']
    coretype : "M7"
    commands :
      - loadfile {test}
    timeout:
      minutes: 2
Device configuration
{% set board_id = '000380000008' %}
{% set usb_mass_device = '/dev/disk/by-id/usb-MBED_microcontroller_02400201E8B77E4E154983F6-0:0' %}
{% set connection_command = 'telnet localhost 7010' %}
{% set hard_reset_command = 'board-control frdm-kw36zj-01 pdu reboot' %}
{% set power_off_command = 'upoco set-state -d hub-01 -p 1 -s OFF -r 200' %}
{% set power_on_command = 'upoco set-state -d hub-01 -p 1 -s ON -r 200' %}
Usage
Note
Images passed to jlink commands must be first deployed using the tmpfs deploy action.
Using the following :
- deploy:
    to: tmpfs
    images:
      shell:
        url: https://.../shell.bin
      hello_world:
        url: https://../hello_world.bin
For the JLink boot method, there are two possibilities:
flashing a single image: It will flash the binary to the load address 0x0 by default.
- boot:
  method: jlink
  timeout:
    minutes: 2
flashing multiple images : It also works with a single image, allowing additional commands to be executed during the flash via JLink.
- boot:
  method: jlink
  prompts : ['SHELL>> ']
  commands :
    - loadfile {shell} 0x0
    - loadfile {hello_world} 0x0
  timeout:
    minutes: 2
method (required): Specifies the method used for booting the device. Set this to “jlink” when using JLink.
prompts (optional): Specifies the prompts expected from the target device. This parameter is optional and is only used when the flashing binary behaves like a shell, allowing for interactive testing. It expects a list of strings representing the prompts.
commands (optional): Specifies a list of commands to execute using JLink. These commands can include loadfile or any other valid JLink command. Additionally, you can use variables in the commands to reference binaries deployed during the deploy phase of tmpfs.
In this example, {shell} and {hello_world} are variables referencing binaries deployed during the deploy phase of tmpfs.
Test Setup with Multiple MCUs
To set up a test requiring multiple MCUs, such as testing Bluetooth connectivity, the best solution is a multinode job. In this setup, MCU 1 and MCU 2 are placed on the same worker. Additionally, a Docker device is used to execute tests once both MCUs have completed their deployment and boot processes.
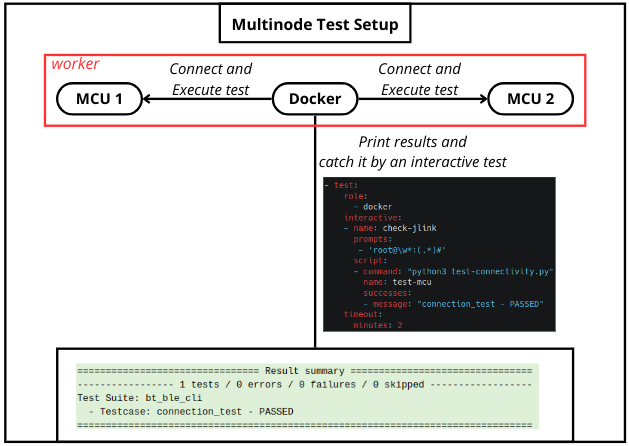
As depicted in the diagram above, the test setup consists of the following components:
MCU 1 and MCU 2: These are the target devices to be tested.
Docker Device: A Docker container is deployed to execute the tests. This Docker device is responsible for coordinating the test execution once both MCUs are ready.
Here’s how the process works:
Deployment and Boot: The necessary images are deployed to both MCUs using tmpfs. Once deployed, the MCUs are booted to initiate the test process.
Test Execution: Once both MCUs have completed their boot processes, the Docker device executes the test suite. This suite includes tests for Bluetooth connectivity or any other desired functionality.
Results Analysis: The test results are collected and analyzed by a LAVA test to verify the functionality of the MCUs and ensure successful connectivity.
new_connection
The new_connection boot method takes no arguments or
parameters. This method can be used to switch to a new connection,
allowing a test to isolate test and kernel messages (if the kernel and
the device are both appropriately configured).
- boot:
    # make the connection to the second uart for use in the test shell
    namespace: isolation
    connection: uart0
    method: new_connection
Note
The new_connection boot method must use a different
namespace to all other actions in the test job. The test
shell(s) must pass this namespace label as the
connection-namespace.
See also
- test:
    namespace: hikey-oe
    connection-namespace: isolation
    timeout:
      minutes: 5
    definitions:
    - repository: http://git.linaro.org/lava-team/lava-functional-tests.git
      from: git
      path: lava-test-shell/smoke-tests-basic.yaml
      name: smoke-tests-basic-oe
qemu
The qemu method is used to boot the downloaded image from the
deployment action using QEMU. This runs the QEMU command line on the
dispatcher. Only certain elements of the command line are available for
modification using the job context. The available values can vary
depending on local admin configuration. For example, many admins restrict the
available memory of each QEMU device, so the memory option in the job
context may be ignored.
context:
  arch: aarch64
  memory: 2048
  # comment out or change to user if the dispatcher does not support bridging.
  # netdevice: tap
  extra_options:
  - -smp
  - 1
  - -global
  - virtio-blk-device.scsi=off
  - -device virtio-scsi-device,id=scsi
  - --append "console=ttyAMA0 root=/dev/vda rw"
The version of qemu installed on the dispatcher is a choice made by the
admin. Generally, this will be the same as the version of qemu available
from Debian in the same suite as the rest of the packages installed on the
dispatcher, e.g. buster. Information on the available versions of qemu
in Debian is available at https://tracker.debian.org/pkg/qemu
media
When booting a QEMU image file directly, the media needs to be specified as
tmpfs.
- boot:
    method: qemu
    media: tmpfs
qemu-nfs
The qemu-nfs method is used to boot a downloaded kernel with a root
filesystem deployed on the worker. Only certain elements of the command line
are available for modification using the job context. The available
values can vary depending on local admin configuration. For example, many
admins restrict the available memory of each QEMU device, so the memory
option in the job context may be ignored.
The version of qemu installed on the dispatcher is a choice made by the
admin. Generally, this will be the same as the version of qemu available
from Debian in the same suite as the rest of the packages installed on the
dispatcher, e.g. buster. Information on the available versions of qemu
in Debian is available at https://tracker.debian.org/pkg/qemu
QEMU can be used with an NFS using the qemu-nfs method and the nfs
media:
- boot:
    timeout:
      minutes: 4
    method: qemu-nfs
    connection: serial
    auto_login:
      login_prompt: 'login:'
      username: root
    prompts:
      - 'root@(.*):'
See also
When using qemu-nfs, the hostname element of the prompt will vary according
to the worker running QEMU:
- boot:
    timeout:
      minutes: 4
    method: qemu-nfs
    connection: serial
    auto_login:
      login_prompt: 'login:'
      username: root
    prompts:
      - 'root@(.*):'
media
When booting a QEMU image using NFS, the media needs to be specified as
nfs.
- boot:
    timeout:
      minutes: 4
    method: qemu-nfs
    connection: serial
    auto_login:
      login_prompt: 'login:'
      username: root
    prompts:
      - 'root@(.*):'
qemu-iso
The qemu-iso method is used to boot the downloaded installer from the
deployment action using QEMU. This runs the QEMU command line on the
dispatcher. Only certain elements of the command line are available for
modification using the job context.
The version of qemu installed on the dispatcher is a choice made by the
admin. Generally, this will be the same as the version of qemu available
from Debian in the same suite as the rest of the packages installed on the
dispatcher, e.g. buster. Information on the available versions of qemu
in Debian is available at https://tracker.debian.org/pkg/qemu
See also
- boot:
    method: qemu-iso
    media: img
    timeout:
      minutes: 20
    connection: serial
    auto_login:
      login_prompt: 'login:'
      username: root
      password_prompt: 'Password:'
      password: root
    prompts:
    - 'root@debian:~#'
media
When booting an installer using QEMU, the media needs to be specified as
img
- boot:
    method: qemu-iso
    media: img
transfer_overlay
An overlay is a tarball of scripts which run the LAVA Test Shell for the test job. The tarball also includes the git clones of the repositories specified in the test job submission and the LAVA helper scripts. Normally, this overlay is integrated into the test job automatically. In some situations, for example when using a command list to specify an alternative rootfs, it is necessary to transfer the overlay from the worker to the device using commands within the booted system prior to starting to run the test shell.
Some overlay tarballs can be quite large. The LAVA TestShell helpers are tiny shell scripts but the git repositories cloned for your test shell definitions can become large over time. Additionally, if your test shell definition clones the git repo of source code, those clones will also appear in the overlay tarball.
Note
The situations where transfer_overlay is useful tend to
also require restricting the test job to specific devices of a
particular device type. This needs to be arranged with the lab
admins who can create suitable device tags
which will need to be specified in all test job definitions.
See also
Secondary media which is more flexible but slower.
The overlay is transferred before any test shell operations can occur, so the method of transferring and then unpacking the overlay must work without any further setup of the rootfs. All dependencies must be pre-installed and all configuration must be in place (possibly using a hacking session). This includes the network configuration - the worker offers several network services to download the overlay and LAVA can populate the URL but the device must automatically configure the networking immediately upon boot and the network must work straight away.
The job could specify transfer_method to choose how to transfer overlay:
transfer_method: httpThis will transfer overlay through apache host service.
- boot:
    transfer_overlay:
      transfer_method: http
      download_command: wget -S --progress=dot:giga
      unpack_command: tar -C / -xzf
Note
The
-C /command to tar is essential or the test shell will not be able to start. The overlay will usegzipcompression, so pass thezoption totar.transfer_method: nfsThis will transfer overlay through nfs server service:
- boot:
    transfer_overlay:
      transfer_method: nfs
      download_command: mount -t nfs -o nolock
      unpack_command: cp -rf
Note
http will be used if transfer_method omitted.
Deployment differences
The -S --progress=dot:giga options to wget in the example above optimize
the output for serial console logging to avoid wasting line upon line of
progress percentage dots. If the system uses busybox, these options may not
be supported by the version of wget on the device.
Some systems do not store the current time between boots. The --warning
no-timestamp option is a useful addition for tar for those systems but
note that busybox tar does not support this option.
The download_command and the unpack_command can include one or more
shell commands. However, as with the test shell definitions, avoid using
redirects (> or >>) or other complex shell syntax. This example changes
to /tmp to ensure there is enough writeable space for the download.
- boot:
    transfer_overlay:
      download_command: cd /tmp ; wget
      unpack_command: tar -C / -xzf
u-boot
The u-boot method boots the downloaded files using U-Boot commands.
commands
The predefined set of U-Boot commands into which the location of the downloaded files can be substituted (along with details like the SERVERIP and NFS location, where relevant). See the device configuration for the complete set of commands.
Certain elements of the command line are available for modification using the job context. The available values vary by device type.
Example
NXP Layerscape platforms supports booting from Alternate Bank, keeping Main Bank safe. If you want to boot the board from Alternate Bank, you can do it by adding context variable “uboot_altbank: true”. By default its value is set to “false”
context:
  uboot_altbank: true
By default LAVA will reset the board power when executing this action. Users
can skip this step by adding reset: false. This can be useful when loading
u-boot in fastboot mode.
- deploy:
    to: fastboot
    docker:
      image: lavalabteam/adb-fastboot
      local: true
    images:
      boot:
        url: https://.../uboot.img
    timeout:
      seconds: 90
- boot:
    method: fastboot
    docker:
      image: lavalabteam/adb-fastboot
      local: true
    timeout:
      seconds: 30
- boot:
    method: u-boot
    reset: false
    ...
uuu
Integration of NXP uuu the flashing tool utility for i.mx platform.
See the complete documentation of uuu / mfgtools on GitHub https://github.com/NXPmicro/mfgtools/wiki
Installation
uuu is not provided as a dependency within LAVA, you need to install it manually over all Slaves.
You can get the latest release here : https://github.com/NXPmicro/mfgtools/releases/latest
# INSTALLATION SCRIPT
wget https://github.com/NXPmicro/mfgtools/releases/download/<UUU_VERSION>/uuu
chmod a+x uuu
mv uuu /bin/uuu
Device configuration
To use uuu the device template must specify two variables :
{# One of the variable above #}
{% set uuu_usb_otg_path = '2:143' %}
{% set uuu_usb_otg_path_command = ['echo', '2:143'] %}

{% set uuu_corrupt_boot_media_command = ['mmc dev 1', 'mmc erase 0 0x400'] %}
uuu_corrupt_boot_media_commanda list of commands to execute on the platform within u-boot to corrupt the primary boot media.On the next reboot, serial download protocol must be available on the platform to flash future images using uuu.
uuu_usb_otg_path: can be obtained using the commanduuu -lsusb. Multiple paths can be provided by using array declaration in device template.
{# Multiple otg path example #}
{% set uuu_usb_otg_path = ['1:143', '2:143'] %}
{% set uuu_usb_otg_path_command = ['echo', '-ne', '1:143\n2:143'] %}

{% set uuu_corrupt_boot_media_command = ['mmc dev 1', 'mmc erase 0 0x400'] %}
uuu_usb_otg_path_commandAllow to customize uuu_otg_path at the worker level, avoiding jinja2 device template modification on the server.Your command must print a well formatted usb path accepted by uuu on each line with no new-line at end of output.
$ uuu -lsusb
uuu (Universal Update Utility) for nxp imx chips -- libuuu_1.3.102-1-gddf2649
Connected Known USB Devices
    Path       Chip    Pro     Vid     Pid     BcdVersion
    ==================================================
    2:143      MX8MQ   SDP:    0x1FC9 0x012B   0x0001
If you want to use uuu within docker image, you could specify next variable:
{% set uuu_docker_image = 'atline/uuu:1.3.191' %}
uuu_docker_image: This is a docker image which installed an uuu binary in it already.
Note
A docker image specified in job.yaml could also override this value in device configuration like next:
- boot:
    docker:
      image: atline/uuu:1.3.191
    method: uuu
    commands:
      - uuu : -b sd {boot}
    timeout:
      minutes: 5
If you also want to enable remote uuu feature, in which situation your device not directly linked to lava dispatcher, you could specify another variable:
{% set uuu_remote_options = '--tlsverify --tlscacert=/labScripts/remote_cert/ca.pem --tlscert=/labScripts/remote_cert/cert.pem --tlskey=/labScripts/remote_cert/key.pem -H 10.192.244.5:2376' %}
uuu_remote_options: This let docker client remotely operate an uuu docker container on a remote machine.
You could follow https://docs.docker.com/engine/daemon/remote-access/ to configure remote docker support.
You could follow https://docs.docker.com/engine/security/https/ to protect the docker daemon socket if you are also care about security.
Note
The minimal docker version to run uuu is 19.03. This is due to a bug in earlier docker versions. See https://github.com/moby/moby/pull/37665.
uuu_power_off_before_corrupt_boot_media: This enables a device power off before corrupt boot media.There is a situation that uboot continues to restart, it will affect uboot interrupt when corrupt boot media. Next configure could power down the device before uboot interrupt, with which you have option to remove the interference:
{% set uuu_power_off_before_corrupt_boot_media = true %}
Usage
Following the same syntax of uuu tool, commands are specified using a pair <Protocol, Command>.
commands field is then a list of dictionary with only one pair of <Protocol, Command>.
A special Protocol named uuu is defined to used build-int scripts.
Note
Images passed to uuu commands must be first deployed using the uuu deploy action if used with overlay.
Using the following :
- deploy:
    to: uuu
    images:
      boot:
        url: https://.../imx-boot-sd.bin-flash
      system:
        url: https://../imx-image-multimedia.rootfs.wic
        apply-overlay: true
        root_partition: 1
Both boot and system keyword are stored as images name that you can reference within uuu boot method commands.
Warning
boot image is required by uuu boot method to perform USB serial download availability check.
The USB serial availability check consist to try to write in memory a valid bootloader image using this command uuu {boot}.
If the command does not terminate within 10 seconds, primary boot-media will be erased using uuu_corrupt_boot_media_command.
Using built-in scripts
Example definition :
- boot:
    method: uuu
    commands:
    - uuu: -b sd_all {boot} {system}
Non-exhaustive list of available built-in scripts :
- uuu: -b emmc {boot}                 # Write bootloader to emmc
- uuu: -b emmc_all {boot} {system}    # Write bootloader & rootfs to emmc
- uuu: -b sd {boot}                   # Write bootloader to sd card
- uuu: -b sd_all {boot} {system}      # Write bootloader & rootfs to sd card
Using commands
Example code :
- boot:
    method: uuu
    commands :
    - SDPS: boot -f {boot}
    - FB: continue
    - FB: done
BCU Integration
Most recent i.MX boards (imx8dxl, imx8mp, imx8ulp, imx93 as of july-2022) support BCU, a remote control utility. BCU allows changing the board’s boot configuration (mainly SD card, eMMC or USB Serial Download Protocol) through a serial interface.
bcu
Integration of NXP bcu the board remote control utility for the boards/platform that support remote control.
See the project readme of bcu on GitHub : https://github.com/NXPmicro/bcu#readme
Installation
bcu is not provided as a dependency within LAVA, you need to install it manually over all workers.
You can get the latest release here : https://github.com/NXPmicro/bcu/releases/latest
Enabling bcu capability on compatible device types
To use bcu the device type template must specify variable :
{% set bcu_board_name = 'imx8dxlevk' %}
bcu_board_name: can be obtained using the commandbcu lsboard:
$ bcu lsboard
version bcu_1.1.45-0-g0b267ba

list of supported board model:

     imx8dxlevk
     imx8dxlevkc1
     imx8dxl_ddr3_evk
     imx8mpevkpwra0
     imx8mpevkpwra1
     imx8mpevk
     imx8mpddr4
     imx8ulpevk
     imx8ulpevkb2
     imx8ulpevk9
     done
Device configuration
To use bcu the device template must specify variable :
{# One of the variable below #}
{% set bcu_board_id = '2-1.3' %}
{% set bcu_board_id_command = ['echo', '2-1.3'] %}
bcu_board_id: can be obtained using the commandbcu lsftdi:bcu_board_id_commandAllows customization of bcu_board_id at the worker level. It avoids device template modification in server side.Your command must print on a single line a well formatted board id accepted by bcu.
$ bcu lsftdi
version bcu_1.1.45-0-g0b267ba
number of boards connected through FTDI device found: 1
board[0] location_id=2-1.3
done
Usage
Following the same syntax of bcu tool, in the boot action the method should be specified as uuu and then
commands are specified in the commands field.
Example definition :
- boot:
    method: uuu
    commands:
         - bcu: reset usb
         - uuu: -b emmc {boot}
         - bcu: set_boot_mode emmc
    timeout:
      minutes: 20
Note
- Serial availability check and bootloader corruption actions are skipped when:
First item in
commandsblock isbcu: reset usb
- Or
commandsblock containbcucommands only
This behavior is useful to recover bricked devices or to use bcu as a standalone action.
Non-exhaustive list of available bcu commands :
- reset BOOTMODE_NAME                 # Reset the board and then boots from mentioned BOOTMODE_NAME.
                                      # Replace BOOTMODE_NAME with different options like emmc,sd,
                                      # usb which can be obtained from command bcu lsbootmode.
                                      # Replace the BOOTMODE_NAME with anyone of the mentioned.
- lsftdi                              # List all the boards connected by ftdi device
- lsboard                             # List all supported board models
- get_boot_mode                       # Displays the boot mode set by BCU